Tracking Visits with Piwik Analytics in Rails

Piwik is an open source web analytics tool written in PHP. With the first release in 2007 it quickly gained popularity as it is easy to install and organizations and individuals have complete control over the tracked data and not a third party (like Google). Right now (2012) Piwik has a global market share of about 2 percent and is ranked second place in Germany with 14 percent.
After installing Piwik on your server and creating a website, you get a JavaScript tracking tag which you have to include in your website. When working with Rails the tracking tag will most likely be embedded in the application.html.erb view. It is not very convenient to include snippets into your views.
The piwik_analytics gem provides an easy way to include Piwik into your application without messing up your view templates.
Installation
Add the piwik_analytics Gem to your Gemfile:
gem 'piwik_analytics', '~> 1.0.1'
Run the generator:
rails g piwik_analytics:install
This will install a piwik.yml configuration file into the config directory of your application.
Configuration
Open up config/piwik.yml and edit the settings. Each setting is described in the config file itself.
# Configuration:
#
# disabled
#   false if tracking tag should be shown
# use_async
#   Set to true if you want to use asynchronous tracking
# url
#   The url of your piwik instance (e.g. localhost/piwik/
# id_site
#   The id of your website inside Piwik
#
production:
  piwik:
    id_site: 1
    url: piwik-production.example.com
    use_async: false
    disabled: false

development:
  piwik:
    id_site: 1
    url: piwik-development.example.com
    disabled: true
    use_async: false

test:
  piwik:
    id_site: 1
    url: localhost
    disabled: true
    use_async: false
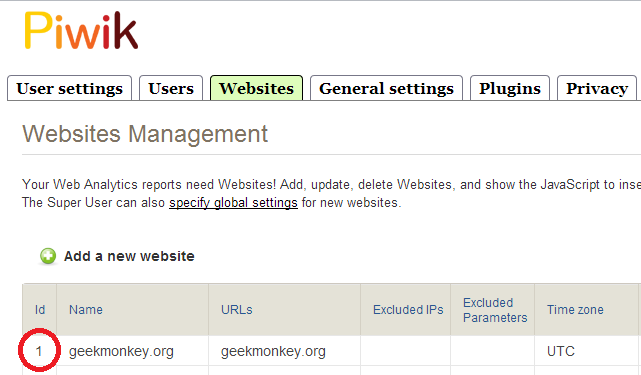
As you can see, by default Piwik is only enabled in production mode. You can of course enable Piwik in the development or test environment by setting disabled: false. You will then need to fetch the site ID of the website you want to track from Piwik. Login to your Piwik Installation, go to "Settings" and click the "Websites" tab.

In this case the site ID is "1". As a last step you need to set the URL of your Piwik installation. If your Piwik is hosted under http://example.com/piwik/ you need to set the URL to example.com/piwik (without the trailing slash).
Piwik supports an asynchronous tracking script since version 1.1. In case you want to use asynchronous tracking in your application, simply set use_async: true.
Usage
The gem provides a simple helper that outputs the tracking tag. Inside your application.html.erb (or haml, slim) you can simply add the following snippet just before the closing body tag.
<%= piwik_tracking_tag %>
Make sure you have disabled: false when you test the gem.
